Monday, April 30, 2012

THEMES: Ice Cream Sandwich for Galaxy Y

Disclaimer: SGY Love will not be responsible nor liable for any damage that might happen to your device during this process though the possibility of any damage is negligible. Try this at your own risk. This process has been tested and verified working on Samsung Galaxy Y. 


ICE CREAM SANDWICH THEME
for
SAMSUNG GALAXY Young (S5360)
 AUTHOR'S DISCLAIMER
*I DO NOT OWN ANY OF THE WARES POSTED HERE. I'M JUST SHARING THIS TO ALL WHO HAS THE SAME HANDHELD AS MINE.*
*THIS IS NOT THE REAL ICS FIRMWARE, THIS IS ONLY A THEME FOR S5360 GALAXY YOUNG.*
*USE THIS AT YOUR OWN RISK, YOUR PHONE WARRANTY WILL BE VOIDED IN DOING SOME PROCEDURES WRITTEN HERE.*
*READ AND UNDERSTAND CAREFULLY BEFORE DOING THE PROCEDURES/INSTRUCTIONS THAT ARE WRITTEN HERE*


ANDROID APPS USED

 CWM (Clockwork Mod)
for installing custom roms, backup and restore previous roms and advace recovery mode!
ANDROID MARKET
download and install apps straight into your handheld!
GO Launcher EX and ADDONS
customize your phone, including notifications, sms, locker and more!
SM@RT KEYB0ARD PR0
the best keyboard app in the market. Fast, accurate, customizable and more!


PROCEDURES AND HOW TO

First of all this can all be done by using Google Search. I just compiled everything here. If you have any QUESTIONS, SUGGESTIONS and COMMENTS please do post so that anyone reading this will have some extra knowledge in this thread.

Secondly, please read the instructions and procedures carefully before doing it so, if you aren't so sure on doing some procedures written here then you are free to ask. I will not entertain questions that is/are already written here on this page. For more general information on Samsung Galaxy Young please visit our general thread here.

OK lets get started.
First root your phone..
for more details about rooting, please visit this thread by MrGambit.

Second step is that you need a Custom Rom, and the closest ROM for ICS look is the Creed's Rom version 2.1!

--== HOW TO INSTALL CREED'S ROM! ==--
NOTE: BACKUP first your apps/3rd party apps from your SD, maraming tools sa market na pangbackup jan. BACKUP your contacts, sms, logs na din.

1. Download nio po ito CWM skin1980(Clockwork Mod)
2. Download Creed's Rom 2.0
(thanks to XDA and pratyush.creed)
3. After downloading CWM.zip and CreedRom2.0.zip, ilagay ito sa ROOT location ng SD card ninyo.
(INFO: ROOT location ng SD means sa pinaka-main folder ng SD card niyo kung saan makikita ninyo ang ANDROID folder, DCIM folder, DOWNLOAD folder and etc. )
4. TURN OFF your phone then go to recovery menu by pressing anf holding (volume up key+home menu key+lock key/hold it until Samsung Galaxy logo came up!)
NOTE: BACKUP is important! Para pag hindi mo na gusto yung Creed's Rom, maibabalik sya sa kung saan ang huling state ng phone mo and have at least 600MB of free space in your SD CARD when backing-up! On recovery mode, press volume keys for up and down and home key as enter.. go to "APPLY UPDATE FROM SDCARD", select the CWM.zip you downloaded and mapupunta ka na sa Clockwork Mod Recovery! Select "BACKUP AND RESTORE" then select "BACKUP". After backup, when you reboot your phone mapupunta yung backup files niyo sa SD Card (/sdcard/clockworkmod/backup/*YOUR FOLDER HERE*) rename the folder if you want but not the files!

5. After lahat ng files ay nabackup na again punta ulit tau sa Recovery mode. Select first "WIPE CACHE PARTITION" and "WIPE DATA/FACTORY RESET".
6. Then after hard reset, go to "APPLY UPDATE FROM SD CARD" then select "CWM.zip" para mapunta kayo sa Clockwork Recovery mode, select "INSTALL ZIP FROM SD", select "CHOOSE ZIP FROM SDCARD" and hanapin ang Creed's Rom 2.0.zip na dinownload nio. After installation ng Creed's Rom, reboot po..
NOTE: Mejo matagal po ang reboot sa mga 1st timers mag CWM. It would take 5-10mins. (First boot you will hear the startup sound and a black screen for about 5-8mins, then vibrate and then the start-up animation. SO PLEASE BE PATIENT, everything is reconfigured kaya po matagal.

7. And whoala! CREEDS ROM 2.0 na kayo (Congrats!) then after enjoying 2.0, download nio ung update ng
Creed's Rom 2.1 HERE.
OR
Unofficial Creed's ROM v2.1 by Saiz HERE
at ilagay ulit ito sa root ng SD Card niyo.
(due to Dialer bug in 2.1, I remove the dialer app in update 2.1 hence dialer from 2.0 will be used. Please check ADDITIONAL TIPS AND INFORMATION section for more info about Unofficial Creed's Rom v2.1 update)

8. Again punta kayo ulit sa Recovery mode, PERO wag na pumunta sa Clockwork Recovery, select "APPLY UPDATE FROM SDCARD" then select "CREED'S ROM 2.1.zip" then reboot!
WARNING: If mag hahardreset ulit kayo, paki install na lang ulit ng Creed's 2.0 via CWM kasi nakakabootloop daw kapag hard reset lang.


--==HOW TO INSTALL ICS SKINS ==--
After installing Creed's Rom version 2.1 (CONGRATULATIONS!), go to Market and download the following applications except GO SMS and GO LOCKER, links to download are posted here.. Don't worry, they are free of charge!
1. GO Launcher EX
2. GO Launcher EX Notification
3. GO Locker - DOWNLOAD GO LOCKER HERE
(go locker app is unavailable at the market, don't know why?)
4. GO SMS Pro version 4.31 - DOWNLOAD GO SMS HERE
(go sms version 4.32 [feb.7 update] has conflict issues with go sms ics theme, dont update this version in the market!)

After downloading and installing all the said apps. Download the skins to make it an ICS look!
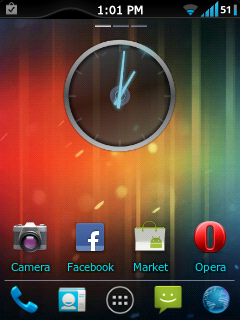
GO LAUNCHER EX ICS Theme --> DOWNLOAD HERE
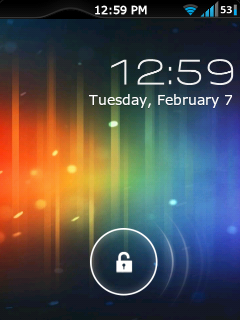
GO LOCKER ICS Theme --> DOWNLOAD HERE
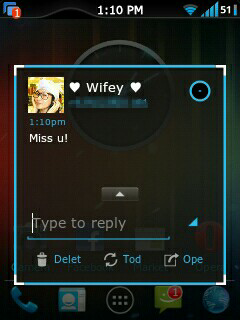
GO SMS Pro ICS Theme --> DOWNLOAD HERE
keyboard with calibration --> DOWNLOAD HERE
Clock Widget --> DOWNLOAD HERE
NOTE : Don't forget to install these skins and app!

After downloading all the files needed to make and look like an ICS theme let's get it on to setting it up.

1. Press the "Home Screen Key" and a pop-up will appear, check 1st "Use by default for this action" then select "GO Locker".
2. Put the ICS Clock Widget wherever you want at the Home Screen.
3. Press "Menu Key" at the Home screen and select "Themes", if you installed the GO Launcher ICS theme, you should see a thumbnail. Select on it and apply.
4. Press again the "Menu Key" at the Home screen, go to "Plugins" tab and select "Go Locker".
5. If you installed the GO Locker ICS theme, you should see a thumbnail. Select on it and apply.
6. On the Home Screen select the SMS icon to popup another window, again check 1st "Use by default for this action" then select "GO SMS". Lock the screen using the "Lock Key" and select again the SMS icon to popup another window, repeat the the default configuration up until to Quick SMS on Contacts.
7. Go to GO SMS and press the "Menu Key" and select "Themes", if you installed the GO SMS ICS theme, you should see a thumbnail. Select and apply.
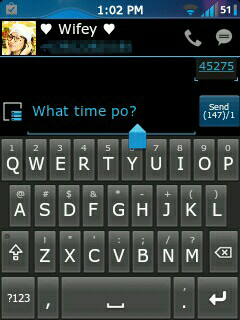
8. Lastly, if you installed the 3rd party keyboard, meron lalabas sa app drawer nio na SM@RT Keyb0ard. select this and press settings, check the SM@RT Keyb0ard Pro then select "Select Input Method" choose the SM@RT Keyb0ard Pro, go to the keyboard settings, select General settings, Select skin then use Android or Gingerbread, whatever you like. (I like this app because this is the most accurate keyboard of all keyboard in the market including the default keyboard. It has a Calibration settings! )

Whoala! ICS Themed na gamit mo! Congrats! For other settings check niyo na lang and explore your new Launchers. 


ADDITIONAL TIPS AND INFORMATION
--Don't UPDATE GO SMS PRO to 4.32 version (feb.07,2012), i noticed some bugs in the new version of gosms na incompatible sa GO SMS ICS theme.

--For more information about Creed's Rom, visit here or visit our very own symbianize threads.
-->by mushashihatred
-->by shykelly

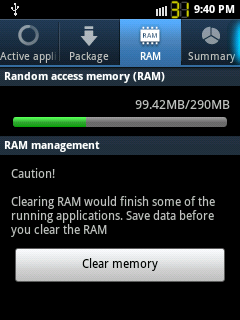
--Free your memory by using Link2SD app. Move or link apps to SD card. For more information about Link2SD visit here or visit our own symbianize thread.
-->peachfive

--Speed up your phone using V6Supercharger Script! For more information please visit our symbianize thread guide here by zxcvb12345.

**UPDATE 02/12**

--Want to sound more like an Ice Cream Sandwich? Including default ICS ringtones, notifications and even your audible touch sound? Then DOWNLOAD HERE.
Here's how to install, there are two ways on installing this compressed file.
First is through CWM recovery, pero take note.. once installed this mawawala yung default na ringtones, notifications and ui sounds, so i suggest to do backup.
Second is manual installing, although matagal at mabusising process ito pero di mawawala yung mga default ninyong sounds, how? I used Script Manager app.
1.Extract the .zip file, and place it wherever in your SD.
2.Open the script manager. of course browse as root.
3.On the script manager window, press Menu key, then select "Advance Options", select "Mount/system as rw"
4.Go back to script manager window.. DONT EXIT script manager, and find where you extracted your ICS Sounds on your SD card, if you want pwede multiselect option sa Menu key. Copy the files you want to add.
5.Dont press the Back/Return key after you copied the files, just press the "folder icon with dot dot dot" to go back until you reach the internal memory (folder icon slash), locate and press the "system" folder, then "media" folder, then "audio" folder. You will see different folders (alarms, notifications, ringtones, ui) select any of the folder which you want to add the sounds and paste it inside the folder.
6.To change audible touch tones, just replace the "TW_SIP.ogg" and "TW_Touch.ogg"
--> thanks to jikantaru of XDA forums

--More ICS skins for GO Launcher EX and addons, just install this APK. (includes GO Launcher skin, GO SMS skin, GO Contacts skin and GO Widget theme)

--Live wallpapers ICS Themed, download here.

**UPDATE 02/14** HAPPY VALENTINES DAY!!

--NEW ICS Unofficial Creed's Update v2.1 by Saiz
What's new and the difference between Creed's Rom Official 2.1 update?
* Bravia Display Engine - REMOVED
* xLoud Sound Enhancement - REMOVED
* Auto Brightness Option - REMOVED
* Calulator and Wallpaper Chooser Added
* 14 Status Bar Toggles Added
* New visuals for Status Bar Added
* Clockwork-Mod Manager Added
* ICS default sounds Added (alarm, ringtones, notification and ui)
* Boot Animation Fixed
* No bugs for Alarm Clock.
* No colored wallpaper at Menu screens (replace only black color wallpaper)

kylecedrick
"Suggestion lng po, mas sharper and better po ang graphics ng widget locker... kung gusto nyu po ICS theme download nyu lang po wallpaper na to then as for the slider, adjust nyu lang po sa ICS default. meron din po sya option na full screen and pwede din po i customize yung lock and unlock sound. Pwede nyu rin po i customize yung behavior ng mga pop ups... heto po yung kay Bratboo, salamat po sa kanya...then customize nyu lockscreen nyu with these wallpapers... Yung Creeds 2.1 okay na sya, nagmumukha lng medyo fake yung mga icons pag naka go-launcher in my opinion lang po..yung Go sms po maganda sya, yung pop ups nya parang ICS na rin talaga..tnx TS!!hope i helped..."
Attachments included :
WidgetLockerLockscreen+v2.2.3.apk (3.13 MB)
ics_wallpapers.zip (2.92 MB)


**UPDATE 02/18**

-- New GT-S5360_CWM.zip uploaded.. A Working backup and restore or your current ROM.

richie
"ayan nkta ko katerno ng Go SMS na theme pra naman sa go contacts"
Attachments included :
ICS go contacts theme.apk (275.0 KB)

-- New GO SMS ICS Theme uploaded
-- Boost your SD after boot? SD BOOSTER (needs root permission) please read the instructions first.


credits to saiz136 of symbianize.com


http://sgylove.blogspot.com

Sunday, April 29, 2012

CUSTOM ROM: Shykelly's ROM v2.1 lite Skin 1980CWM backup for Galaxy Y

Disclaimer: SGY Love will not be responsible nor liable for any damage that might happen to your device during this process though the possibility of any damage is negligible. Try this at your own risk. This process has been tested and verified working on Samsung Galaxy Y.

  
Shykelly's ROM v2.1 lite Skin 1980CWM backup

http://s017.radikal.ru/i416/1202/46/4aacb1668b0c.png
Features:
deodexed
zipalign
v6 supercharger
beats audio
rooted
busybox 1.19.4
google play
openvpn
droidvpn

VIDEO TUTORIAL

INSTRUCTIONS:
1. Download your Custom Rom
2. Download ClockworkMon Recovery
3. Put all your download files on your Root SD(do not put the files inside a folder)
3. Turn Off your SGY,after vibrate, "Press Volume Up+ Home Button+Power" for Recovery Mod
4. Choose Apply SD card Update then Choose ClockworkMod Recover
5. You are in ClockworkMod Recovery, and you need to backup your files to avoid unnecessary error...so you can restore your previous SGY setup...
6. After you backup your files do wipe data and wipe cache
7. Install zip from sdcard and Choose your Custom Rom 
8. FINISH you can reboot your SGY and wait it take long for first boot


http://sgylove.blogspot.com

Saturday, April 28, 2012

CUSTOM ROM: CreedSix ROM for Galaxy Y


Disclaimer: SGY Love will not be responsible nor liable for any damage that might happen to your device during this process though the possibility of any damage is negligible. Try this at your own risk. This process has been tested and verified working on Samsung Galaxy Y.

 CUSTOM ROM: CreedSix ROM for Galaxy Y
http://s017.radikal.ru/i416/1202/46/4aacb1668b0c.png

This ROM is based on pratyush.creed's CREEDS' ROM. All from version 2.0 to 2.5 mixed and made it BETTER. Plus few system apps and tweaks I added.

Tested and working on DXKL2.
Working on S5360DXKL2 Baseband Version ROM (Stock and Custom) since this is a CWM Recovery and not a flashable zip file.

Features:
•Adb/Hard Root
•A2SD Darktremor Ready
•Soft Root- Superuser v.3.07
•Pre Deodexed
•ZipAligned
•Maps With WorldWide Navigation
•Bloatware Apps Removed
•BusyBox Support v.1.19.3
•Supports init.d tweaks
•Includes 30+ init.d tweaks
•V6 Supercharged at 512HP Balanced settings
•Kickass Kernelizer tweaks
•3G Booster Fastest setting
•Detailing: SQlite Vacuum & Reindex ready!
•Engine Flush ready!
•Includes 4 Wallpapers
(Includes Message App)
-No Auto Sms To Mms Conversion
-No Receipient Limit
-Built In 5 Theme
(Touchwiz App Samsung Home)
-Transparency Level Increased
-Alphabetical Auto Arrange
-Landscape Orientation Intoduced
-ICS Icons
-ICS Tones (Notification, Alarm, Ringtone & System UI)
-Boot Animation Enabled
-Custom Boot Animation Added
-Custom Power On Sound
-Reduces Startup Time ~Less Than 13 seconds
(14 Status Bar Toggles)
•All 5 From Samsung(Wifi,B/T,Soung,GPS,Orientation)
•Data
•Lockscreen-Off
•FlashLight
•Shut Down Options
•Reboot,Recovery & Download modes
•Airplane Mode
•Brightness
•Auto Synchronise
•Screen Timeout
(Fixes and Removed)
•(fix) Boot Delay on v2.0
•(fix) Alarm Clock bug on v2.1
•(fix) Keyboard Missing on v2.5
•(removed) ICS Locscreen on v2.5
•(removed) Email app on v.2.0

(Additional Apps)
•Chainfire 3D
•DSP Manager
•Facebook
•Link2SD
•Memory Booster PRO
•SD Booster
•Quickoffice PRO
•Script Manager
•Smart Keyboard
•Super Backup:SMS & Contacts
•TTPod English Version
•Youtube Downloader
•Titanium Backup Pro


INSTRUCTIONS:
NOTE: Be sure you are using DXKL2 Baseband Version (Settings > About phone), if you are using a different version, please click here on how to change your firmware version.

1.) Download CWMRecovery.zip here.
2.) Move CWMRecovery.zip onto your SD Root.
3.) Download sdcard_saiz.zip here
4.) Extract "sdcard_saiz.zip" either to your Desktop PC or mobile.
5.) Locate the extracted zip file "sdcard_saiz" folder.
NOTE: If you have a previous CWM backup, you can just copy "CREEDSiX" folder into your SD root "/sdcard/clockworkmod/backup/PUTCREEDSIXFOLDERHERE"

6.) Copy all files inside the folder and paste it in your SD root, overwrite all! If you have a previous CWM backup, don't overwrite clockworkmod folder.
7.) Shutdown your phone.
NOTE: Remeber to BACKUP your current ROM, apps, contacts, messages and etc.

8.) After shutdown, go to recovery mode by pressing and holding (volume up key+home key+lock key), when Samsung logo appears, release the keys.
NOTE: Recovery menu controls are Volume up and down keys for up and down and Home key for enter.

9.) On the recovery mode, select "apply update from sdcard".
10.) Choose "CWMRecovery.zip"
11.) You will be brought to CWM Recovery Mode, select "Backup and Restore" then select "Restore", choose "CREEDSiX" and wait for the data to be restored.
12.) After restoring CREEDSiX, go back by pressing the soft back key and select "Reboot now".

ENJOY CREEDSiX ROM!!


Bugs encountered:
- Signal Bar status at firstboot
(Due to status bar from v.2.5, conflicted with v.2.1/2.0 framework, I don't edit apk files so I'm sorry to say I can't fix this, maybe some members here in the forum can fix this.)
- Swipe to clear Notification force closes
(Again this was a conflict in frameworks. However clear all button is working fine.)
Since this is my customization of Creeds' Rom, I didn't add the ICS lock-screen from v2.5, and don't like the SYWPE keyboard also, very confusing indeed.


Tips :
• Check if you are V6Supercharged! Open Script Manager app, then select "V6_SuperCharger_for_Android-Update9_RC6.9.sh.pdf". A popup will appear, select "RUN", be sure SmartKeyboard is enabled on your Input Method. Press enter if the script says it, at the bottom of the script you will see if you are 100% SUPERCHARGED.

• SDBooster app gives you a boost on your SD card! Initial boot scanning, deleting, copying, moving files are much more faster. If you have a 2GB SD, set it to 1024 then check "Set on boot" then apply, if you have 4GB SD, set it to 2048. Remember after putting the values, red mark is too low, green mark is normal and purple mark is too high!

• To fully maximize your Link2SD app, you should partition your SD. For more info on partitioning, please visit here. There are some user apps that can't be moved to SD, or user apps that has widget ability. If you move these apps to your SD, its either the app will force close or no widget ability. Link these apps rather than moving them. Link2SD forbids to move or link System Apps, so don't attempt these because it will never happen.

• Memory Booster app is all in one killer app! It boost your RAM and at the same time it has a TASK killer app also.

• If you have HD games or you felt that your games are slow and laggy, use 3D Chainfire app. Just reduce the Texture Quality and use a plugin. WARNING: It may affect other apps quality also, including Gallery app and etc.
POWERVR
QUALCOMM
NVIDIA

• Want to download videos on Youtube? Use Youtube Downloader, just open the video you want to download, then select "More" and choose "Download"

• Titanium backup installer and its patcher is located on the root of your SD, install two apk's and open first the patcher, activate the patch then open Titanium Backup!


3 Status Bar and Notification Creeds' Skin:

These are Status Bar and Notification Skins from different version of Creeds' ROM, all of it are full 14 toggles. Version 2.0 and 2.1 are tested and fully working without bugs. Enjoy!

WARNING: If you used "Integrate Sys into ROM" on Titanium Backup, this installation of status bar WILL cause Softbrick!! If not, then you may proceed.

Download here Released Version 2.0
Download here Released Version 2.1
Download here Released Version 2.5

How to Update Status Bar Skins:
1.) Move the downloaded skins onto your SD root location.
2.) Shutdown your phone and go to Recovery Menu or select Reboot toggle in your Notification bar and choose "Recovery"
3.) Select "apply update from sdcard"
4.) Choose desired Status Bar version.
5.) Reboot!


credits to saiz136 of symbianize.com


http://sgylove.blogspot.com

Cordy Sky for Android [Apk]


Cordy Sky

https://lh3.ggpht.com/PZQT6CYeu3O4grknR9gARvEZhcgdzRXugb10XvFb_noaJXpP5R29IErUYXfBTMqZ_Woohttps://lh6.ggpht.com/OSsoHez5RjmSA1nWTNDiX3PnZU2UBsCE93vN-86LEo0B7yKWq1uuzS3PikNkA-C5hv0
https://lh6.ggpht.com/9nC7CBnHMpyKz4nYRR4LJHnGja5-NTHER0z9FVoI_4WtBN0EmK75aVJMJGD4wv3WIt0https://lh5.ggpht.com/PHjteBm_ci8v1l3tVdyspazpu9-wYOjHMxY6CiBW-u3jRPwnw9X1znVW3OSEPjuGwss

Cordy Jumps to a Platform Near You!
Welcome to Cordy Sky, brought to you by SilverTree Media, the team behind the #1 hit games Cordy and Sleepy Jack!

On his journey to Planet 2, Cordy crash lands on a mysterious sky planet, where he meets a stranded robot named Volt. Together they take to the sky to refuel their rocket ship and head toward undiscovered planets!

Guide Cordy through incredible springs, bumpers, hover beams, and more in this amazing high-quality 3D game. Download now, and get ready to experience a fantastic, casual Cordy adventure!

• PARENTS! It's possible to spend real money inside this game. You can disable In-App Billing in the Pause menu.

• SPEND GEARS ON AMAZING UPGRADES. There are Power-Ups, Costumes, and Colors. You can earn Gears in the game OR buy them if you're in a hurry!

• COOL ACHIEVEMENTS. Earn badges for style. Do you have what it takes?

• NEVERENDING FUN. Finish the story, then see how high you can go.

• TRY THE ORIGINAL "CORDY" GAME, TOO! One of the Top 10 best games of 2011 -The New York Times. #1 app in the United States, Canada, China, Germany, France, Spain, and many more! Featured "Editor's Choice", "Staff Pick", and "Best Arcade & Action" by Android.

• WANT MORE GAMES LIKE THIS? Play SLEEPY JACK! Top 10 Best of E3: "Adorable Psychonauts-esque presentation and solid gameplay...that is also tight and arcadey" -Pocket Gamer BEST APP OF THE WEEK: "It's the sort of happiness-inducing experience that you want to share with everyone." -Kotaku

• 8 LANGUAGES. Supports Spanish, French, German, Italian, Russian, Korean, Chinese, and Japanese. Pick one of these in your device's Settings menu.


http://sgylove.blogspot.com

TUTORIAL: How to Unlock / Openline Galaxy Y S5360 / S5363

Disclaimer: SGY Love will not be responsible nor liable for any damage that might happen to your device during this process though the possibility of any damage is negligible. Try this at your own risk. This process has been tested and verified working on Samsung Galaxy Y.


Things you need before starting the unlock tutorial of your Samsung Galaxy Y S5360/ S5363:
- Download Android SDK. Install it;
- Download a HEX Editor;
- The device must be rooted with Busybox
- Check your mobile network code(MNC) and mobile country code(MCC)

Note: In getting your present netlock MNC+MCC code..base on this example..
im in the Philippines so ill use Philippine network provider codes.
515=MCC
02=MNC
so MCC+MNC=51502(netlock)


This procedure will deal with bml15.bin. You can find more details on this XDA thread.

1. Connect your smartphone to the PC, using the USB cable.

2. Access the command prompt in your Windows computer. In order to do that, click on Start button, and in the search field, type ‘cmd.exe’. Once found, open it. In this window you need to head to the folder where Android SDK has been installed. It should like this: C:\fastlink2.com\Android\android-sdk-windows\platform-tools. Here you need to run ‘adb shell’, using the command prompt.or go to    android sdk platform directory then press shift right click then choose open command prompt here.

3. Enter this codes on cmd
    adb shell
    su
    cat dev/block/bml15 > /data/local/bml15.bin
    exit
    exit
    adb pull data/local/
   

Then you will see a bml15.bin on the platform tools of android sdk make a back up of your bml15.bin for emergency

Minimize cmd


4. Open bml15.bin using hex editor then press ctrl+f and search string 51502 or 51503 or 51505 which is the default netlock of your SGY.
When you found it, just replace it with the following: 51502 (globe), 51503(smart), 51505(sun).

Note: There will be two 515 string that you can change then save it and rename the file like this: bml15_unlocked.bin

Example: you found 51501 51502 which is globe you may change it to 51502 51503 so you can have globe and smart netlock

Make sure you use hex 0x00

Here's the diff of my bml15:

original SIM-Locked:
    0080000: XXXX XXXX XXXX XXXX XXXX XXXX XXXX XXX0 (IMEI REMOVED)
    0080010: ffff ffff ffff ffff ffff ffff ffff ffff
    0080020: ffff ffff ffff ffff 6937 6c7d 4e33 6058
    0080030: 5346 ffff 491a 4bac 4d6d 4f60 5153 6433
    0080040: 5585 5758 ffff ffff 0101 0000 0600 0000
    0080050: XXXX XXXX XX23 0073 0000 0000 0000 0000 (PROVIDER REMOVED)

Changed to:
    0080000: XXXX XXXX XXXX XXXX XXXX XXXX XXXX XXX0 (IMEI REMOVED)
    0080010: ffff ffff ffff ffff ffff ffff ffff ffff
    0080020: ffff ffff ffff ffff 6937 6c7d 4e33 6058
    0080030: 5346 ffff 491a 4bac 4d6d 4f60 5153 6433
    0080040: 5585 5758 ffff ffff 0000 0000 0000 0000
    0080050: 0000 0000 0000 0000 0000 0000 0000 0000

5. Open CMD again then enter this codes
    adb push bml15_unlocked.bin /data/local/bml15_unlocked
    adb shel
    $ su
    dd if=/data/local/bml15_unlocked of=/dev/bml15
    # exit
    $ exit
 
6. Restart your Samsung Galaxy Y S5360/ S5363

7. Insert other sim...


http://sgylove.blogspot.com

TUTORIAL: How to Install Beats Audio to your Galaxy Y

Disclaimer: SGY Love will not be responsible nor liable for any damage that might happen to your device during this process though the possibility of any damage is negligible. Try this at your own risk. This process has been tested and verified working on Samsung Galaxy Y.


Not too long ago, we wrote about how Beats Audio was slapped onto the Motorola Photon 4G. Now it seems almost all smartphone users can enjoy the popular sound modification. Built upon previous work by XDA Forum Member RockoDev who originally ported the package, this modification now works on all Gingerbread devices and is distributed from a thread by XDA member fuss132 . Yes, that’s right. 

What exactly is Beats Audio? It’s an equalizer, a good one at that. It actually happens to be a branded equalizer. Beats Audio also manufactures products such as earphones, headphones etc. On HTC smartphones, Beats Audio is an equalizer that offers unmatched sound experience never seen before on Android devices. No other manufacturer officially makes Android devices that are compatible with Beats Audio by default. 

The team up of HTC and Beats made it an explosive deal that made HTC phones add more color and flavor to their powerful Android devices with the help of the popular Beats Audio. Through this Beats integration, HTC devices will now produce crispier and better sound in their speakers making it feel like heaven when listening to their favorite music.
As you may have assumed, Beats Audio on HTC phones has nothing to do with hardware; it’s just an advanced audio equalizer. This is a Beats Audio Port and should work for all Gingerbread Roms. The sounds will be more natural, playing with more clarity.


Requirements to run Beats Audio in your phone:
  • Rooted Android 2.3.x Gingerbread
  • Flashable Beats (zip file)
NOTE: Before you start, make sure to back up all your data and a copy of your ROM to your computer to prevent data lost if ever there would be a conflict. 

INSTRUCTIONS:
  1. Download the file Beats CM7LGO1.zip
  2. Place that zip file in the root of your SD card (not placed in any folder).
  3. Switch on your phone and boot to recovery.
  4. Select install zip from SD card. 
  5. Find the Beats Audio file and select it.
  6. After installation, reboot your phone.
  7. Congratulations you’ve successfully installed Beats Audio!


http://sgylove.blogspot.com

Friday, April 27, 2012

TUTORIAL: How to Install Link2SD for Android [Apk]

Disclaimer: SGY Love will not be responsible nor liable for any damage that might happen to your device during this process though the possibility of any damage is negligible. Try this at your own risk. This process has been tested and verified working on Samsung Galaxy Y.

Link2SD is an android application by Bulent Akpinar that lets you move apps and games to the 2nd partition of your SD card. Why do we have to use Link2SD when Froyo and Gingerbread’s Native Apps2sd moves the files to the SD card? 

Native apps2sd only moves the apk file of the application leaving other files in internal memory thus you still have to manage your on-board memory and limit your choice of apps because it will eat up your memory and later on you cannot install any files anymore. Additionally, widgets and some applications are not intended to be move to the SD card. However, Link2SD is only for root users because it is required that your phone is rooted.

The idea behind the application is the same. But Link2SD has more relevant features which the Native Apps2sd lacked giving Android 1.5 and up users the chance to have a taste of what it’s like to have a big phone memory. Additional features were added by the developer to furher optimize the usage of android devices. 

By using Link2SD, you can move not only the application file, but also  the dalvic-cache and libray files of the application. This means that data will be the only one left to consume your internal memory thus installing applications and games would be easier because you can install anything you want without worrying about the famous low memory problem. Furthermore, Link2sd covers all files even moving widgets and the unmoveable applications to the 2nd partition of your SD card. 

This is a step by step guide on how you can run Link2SD on your device. This tutorial will work for both stock and cutom ROMs. 

For ClockWorkMod Recovery users, you can check the other guide below

Follow all the instructions carefully to eliminate possible problems.

1. First you have to download Mini Tool Partition Wizard Manager below.
2. Insert your SD card to a card reader and open it on your computer.
3. Back up all your files to the computer because partitioning will wipe your data.
4. Open Mini Tool in your computer. Locate your SD card (be careful in choosing and make sure not to choose the drive of your computer)
5. Right click and choose Delete.

Image 

6. Right click on it again and choose Create New. Create “FAT32″ partition (This is where all your media files will go. Be sure to make it bigger than the 2nd part) 
7. Select “Create as: PRIMARY” 

Image

8. Next, create an ext2/ext3/ext4 partition (if you’re on stock ROM, choose ext2). This is where your apps will go. I suggest a value of 512Mb or 1Gb would be big enough but if you insist you can go as high as 2Gb.9. Select “Create As: PRIMARY” (make sure that it is both set to primary because it will not work if it is not set to primary) 

Image

10. Click the “Apply” button on the top left corner and wait for it to finish the process. Done.11. Put back your SD card to your phone and switch it on.12. Download and install Link2sd below13. Open Link2sd. You will be prompted to choose between ext2, ext3, ext4 and FAT32. Select ext2.

 Image

14. It will say mount script created. Reboot your phone now.15. Open link2sd and if the message doesn’t show up, you succeeded.16. Go to Link2sd>Settings>check the auto-link (to automatically move apps upon installation)17. If you already have some apps, select “move to phone” then after moving select “Create Link” (be sure to check the three files: app, dalvic-cache and library files)

ImageImage
 
18.  To check your memory, select “Storage Info”. This will show you the current state of your internal memory, FAT32, and ext2 partition.           
                                                                                 
Image 

Now you’re done and ready to install vast amount of applications as you wish!

 
ALTERNATE METHOD(FOR CLOCKWORKMOD RECOVERY USERS ONLY)
 
NOTE: You can also use the instructions above. This guide will work on both stock and custom ROMs.
  1. Back up all your files to your computer. Partitioning wipes the files of your SD card.
  2. Go into recovery mode
  3. Select “Advanced”
  4. Select “Partition SD card”
  5. Choose your SD-ext size (if you’re using a 2Gb SD card, choose 512Mb. If your SD card is 4Gb or greater, you can choose 1024Mb)
  6. Select 0 swap
  7. Wait for the process to finish. Reboot.
  8. Download and install Link2SD below
  9. Open Link2SD you will be prompted to choose between ext2, ext3, ext4 or FAT32. Choose ext4.
  10. It will say mount script created. Reboot your phone now.
  11. Open link2sd and if the message doesn’t show up, you succeded.
  12. Go to Link2sd>Settings>check the autolink (to automatically move apps upon installation)
  13. If you already have some apps, select “move to phone” then after moving select “Create Link” (be sure to check the three files: app, dalvic-cache and library files)
  14. To check your memory, select “Storage Info”. This will show you the current state of your internal memory, FAT32, and ext2 partition.  


http://sgylove.blogspot.com